

How To Photograph The Northern Lights With A Point And Shoot Camera
Equipment for Northern Lights Photography
Showtime of all, let's accept a look at the equipment that you need for Northern Lights photography.
- All-time camera: digital SLR or mirrorless camera with interchangeable lens.
- Alternative camera: any camera with manual settings (but you get less skilful results).
- Best lens: yous need a fast lens. This means that information technology needs to catch equally much light equally possible. This is indicated by the f number of the lens, which should be as small as possible. Ideally, nosotros want to apply f/1.4 or f/ane.8 but those lens are quite pricey. F/ii.8 is more standard and also good.
- Culling lens: y'all tin can likewise achieve nice photos with f/3.5 or f/4 just you lot'll need to increase the ISO. These lenses correspond to virtually lenses from the basic kits that are frequently sold with cameras.
- Tripod: a solid tripod is essential for Northern Lights photography. You volition be doing long exposures, so you really want the camera to be every bit stable as possible. If y'all can, avoid plastic tripods, as in the cold temperatures, plastic has a tendency to intermission quite hands.
- Remote control: this will help minimise vibrations when you release the shutter. I personally prefer cable remote controls. Some photographers complain that the cables freeze and become inflexible in very cold temperatures. This does indeed happen, merely I never felt any hinder from this. For timelapse shots, you lot need to utilize an intervalometer.
- Batteries: in cold atmospheric condition, batteries get drained much faster and therefore are losing very rapidly their chapters. Therefore yous should always travel with at least one spare battery. I recommend travelling with many spares. Imagine the disappointment if the aurora shows up and you don't have power in your photographic camera!

Earlier you fifty-fifty travel
Before we move to explaining all the camera settings for capturing Northern Lights, I have i important slice of advice. I endeavor to repeat this to all my customers because it is the key for a successful photoshoot.
Learn dark photography at home. You need to know your equipment before going on a trip to photograph the aurora.
If yous have to figure out what all the buttons and dials of your camera do when the aurora is starting, non simply will it be very stressful for y'all, merely yous will also not enjoy the evidence as you should.
There are sufficient sources on the Internet to help you discover your own camera. A good way to get-go is of grade to read the user's manual of your own device.
Focusing
Focusing is probably the hardest matter to achieve when yous endeavor to take pictures of the Northern Lights. The goal of a precise focusing is that the stars in your photos look pinpoint sharp.
It is also dark at dark to be able to count on the autofocus mode of your camera and lens unless you use extra calorie-free sources. If the Moon is shining, you tin can attempt using the autofocus on it. When it doesn't, you can utilise the headlights of a car, or a headlamp to light up a tree. You just demand to make sure that you are at least 30 meters away from the object that you are focusing on. Set the focus (usually by pressing halfway the shutter release button of your camera). When this is done, switch dorsum your camera to manual focus mode, and don't touch it anymore!
Focus ring
Some lenses accept an infinity sign on their focus ring. Unfortunately, generally, this infinity sign is non accurate. I highly recommend checking before your trip that this infinity setting produces abrupt images of afar objects.
Alternatively, yous tin can continue your photographic camera in manual focus way, and use the alive view function at maximum magnification. Attempt to observe some bright stars, and very gently turn your focus ring until the stars look very sharp. This is quite an advanced technique, that requires a really stable tripod, otherwise it is almost impossible to run into the stars properly.
My focusing tip
I use agglutinative record to record together the focus ring and lens barrel to brand sure that I will not inadvertently turn the band at dark in the dark. It is such a relief to be able non to worry about this at all during the unabridged night. Try it!
ISO settings
The ISO setting corresponds to the sensitivity of your camera's sensor. The college the number, the more calorie-free is collected by the sensor.
Even the brightest auroras crave a higher ISO value. After all, don't forget that you are taking pictures in the middle of the dark. However, too high ISO values tend to produce digital racket on photos. You should therefore use the highest possible ISO value that does not deteriorate also much the quality of your images. This is something that you need to check for yourself depending on your own camera. As a general dominion, I would recommend using the following maximum values:
- 1600 ISO for meaty and system cameras. These cameras take a smaller sensor, which tends to produce grainy pictures above this setting.
- 1600 ISO – 3200 ISO for APS-C reflex cameras. Their sensor is larger than the to a higher place mentioned cameras, but still tend to produce noise. The older your camera, the lower the maximum ISO value.
- 3200 ISO (or more) for the about contempo full-frame reflex cameras.

My bones setting is 3200 ISO unless:
- The Aurora is very bright and as a upshot, I will go as low every bit 1600 ISO
- The Aurora is very faint and as a outcome, I will push button every bit high as 6400 ISO
I apply a high-end full frame reflex photographic camera that is extremely tolerant with digital noise until 6400 ISO. So this is my maximum value.
Aperture
As we saw above, you need a lens with a large aperture, which converts to a small aperture value. When photographing the aurora, with your camera in manual mode (often indicated as M on a selection bicycle or in a menu) just use the smallest value available.
My usual aperture setting
Until recently, I was taking all my photos with a f/two.8 lens, which was my fastest available lens. In the wintertime 2017-2018, I started using the magnificent Sigma 14mm f/1.viii ART lens. With a f/1.8 aperture, my lens is now 1 1/3 stop faster, so it captures more than twice as much light as my previous one.

Shutter speed
Out of all the DSLR camera settings for Northern Lights photography, the shutter speed is in my stance the most of import. Because the aurora is ofttimes moving quite fast across the heaven, it is improve to try and shorten the exposure fourth dimension. Of course this will depend on the intensity of the aurora. The brighter auroras will require a "short" exposure time while for the fainter ones yous will need additional time.
My usual aperture setting
I usually take 3 ranges of shutter speeds for my Aurora pictures, assuming 1600-2500 ISO and f/2.8-3.5:
- Faint Auroras (barely visible with the naked middle): 10 to 20 seconds
- "Average" Auroras (visible most nights north of the Arctic Circumvolve): five to 10 seconds
- Bright Auroras (usually also very fast): 0.5 to 5 seconds.
Of course, college ISO allows yous faster shutter speed. But to preserve skillful image quality, the ISO value should non be too high. Yous just need to find the right trade-off. At the end of the day, information technology all comes down to your own camera equipment and your feel with it. That's why I always recommend to railroad train commencement at home to take night pictures. Yous don't need Aurora in the sky to notice what is the "sweetness spot" for your own camera in terms of ISO.


Bank check your exposure
I have noticed that a lot of people set the brightness of their camera'due south screen to a very high level. This can lead to believing that your photos are well exposed, when in reality, they are widely under-exposed. This is valid all the time but fifty-fifty more so at night. Again, information technology depends on your own camera, only I recommend setting the brightness not higher than l% of the maximum.
You can besides cheque the levels histogram if your camera displays it. Ideally, the curve should not be concentrated too much to the left. Nevertheless, I don't believe that you should aim at having it roofing the entire width, unlike when you are shooting daytime landscapes.
Files system
All digital reflex cameras permit you saving your photos in the RAW format. This format is an uncompressed version of your photos. It gives you lot much more flexibility in post-processing considering the prototype contains much more than "invisible" information than a regular compressed Jpeg file.
I practice not see any reason why shooting photos in the Jpeg format except for saving space. But with the electric current low costs of retention, this does not sound like a good reason either.
White balance
If y'all salvage your photos in your camera'southward RAW format, then you do not demand to worry too much about the white balance. Y'all can always set information technology up to your liking later on in a photograph editing software like Adobe Lightroom. Even so, so that the pictures on your photographic camera screen look a bit realistic, I recommend setting the white balance manually betwixt 3500 and 4000 K.
For those who still save their photos in Jpeg format, do non utilise the automatic white balance! Considering the lights and colours always change, your camera will not be able to properly analyse the scene to define the white balance. As a result y'all will not have the same color temperature on all photos. Moreover, I noticed that very often, automatic white balance produces much to "warm" Aurora photos. The greenish in that location turns too much towards yellow.
So if yous really insist in shooting in Jpeg, I find that the "fluorescent" white balance setting comes the closest to reality in about cases. Unfortunately there is no general rule, hence once more the recommendation for RAW files. Otherwise, set it to something comprised betwixt 3500 and 4000 K as nosotros saw just above.
I am talking more than near white balance in the following tutorial: how to edit your aurora photos.
Racket reduction
As we noted earlier, higher ISO settings often pb to grainy photos. In other terms, digital noise appears. About recent cameras have a "long exposure noise reduction" option. I plow this option off and use noise reduction in post-processing software. I notice that this allows to preserve much more detail in the photos. The software lets you really fine-tune the settings, while when done inside the cameras information technology is mostly "on" or "off" with nothing in between.
But over again here, if yous shoot in Jpeg, and don't program to edit your photos subsequently, and so you may desire to find this setting and turn information technology on.
Filters: no, no and no!
NEVER use a filter on your lens when photographing the auroras. I know that you lot may want to utilize a neutral UV filter to protect the front drinking glass of your precious expensive lens, and I can understand that. However, filters will produce a series of concentric circles in the centre of your image, which will be consequently be ruined. It is extremely hard if non impossible to erase those circles in mail service processing.
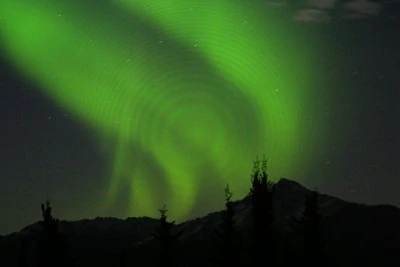
With this example you can sympathize why information technology volition be impossible to edit these circles out of the pictures.
Practise your camera settings for the northern lights with me!
Afterward you accept taken your amazing aurora photos, learn with me how to edit them! Or peradventure y'all want to join me on i of my upcoming photo trips? During the winter trips in high latitude regions, we focus on dark photography and have a chance to apply all these trips. Of form, I always stand near you to help.

Source: https://rez-photography.com/best-camera-settings-for-northern-lights-photography/
Posted by: griffithdeally.blogspot.com
0 Response to "How To Photograph The Northern Lights With A Point And Shoot Camera"
Post a Comment